The first procedural manipulation followed a similar process as Project 1. I created a matrix of my new and improved surface starting from the bottom left hand corner and moving to the top right hand corner. My intention was to turn this curvy surface into a flat surface using a repeatable procedure. First I scaled back the control points at the bottom center of the surface by 0.1" increments as I copied the image up a column. I stopped the manipulation when I created a visually smooth curve of the surface, without any recollection of what iteration I was on. Second I scaled down both edges of my surface together in 0.2" increments on the outer control points and 0.1" increments on the inner control points. I did this as I copied the columns down the rows, one column at a time. Again, I stopped the manipulation when I created a visually flat surface at the top of the last column without considering the number of iterations I had performed. Therefore, the termination of both manipulations in this procedure was based on the overall view of the surface, resulting in a final, relatively flat surface.


As I looked at my matrix, I realized some of the surfaces resembled the profile of a bowl. So I copied the surface that had the most resemblance and began rotating it about its local Y axis at the center of the edge with the depression. I rotated it in 10 degree intervals but this time decided to terminate the iterations at a preconceived value of 180 degrees, thinking that this would complete my bowl. While it did resemble a bowl from the side, as I rotated the camera it looked more like a bowl with like a handle, or a "sippy edge". Further rotation made it look like an interesting entrance into a tunnel (with some imagination of course). I decided to complete my bowl and carry the original procedural manipulation a full 360 degrees.


Besides a bowl, my object now reminded me of the roof of a Japanese house (or at least my mental image of a classical Japanese house). So I inverted the bowl and then looked up some images I could base my next procedure on.


Using these images from Google, I started my third procedural manipulation. This procedure started by copying the surface vertically, 6 times to match the image. Then I scaled down each surface following the bottom one by 10% increments, ending the top surface at 50% the size of the bottom surface. Then I took the center tip control point of each surface and moved it vertically up by increments of 1". This iteration stopped when the surfaces stopped; therefore it went from 1" at the bottom surface to a 6" move of the control point at the top surface. Hence my Japanese house roof that looks more like a Christmas tree.


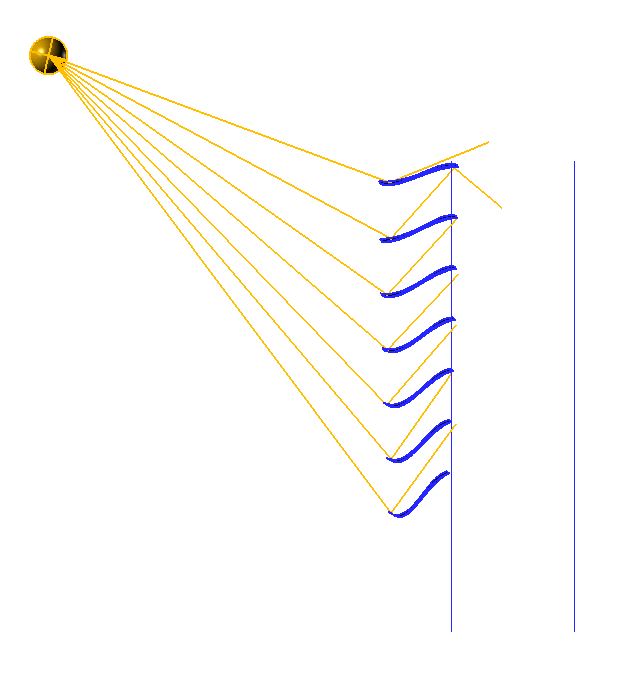
I started this manipulation by going back to my original surface and mirroring half of the surface below the horizontal line at the base of the surface. The result was an "S" shape. I then modeled a sun and created rays of light to a vertical line of my surfaces representing the multiple roofs along the side of my building. I then rotated each "S" about its building side end by multiples of 5 degrees. I stopped at the top at 25 degrees from horizontal, thinking that at least some slope was still necessary for rain dispersion. At the bottom of my line I stopped at 55 degrees, thinking too much slope would not allow for light penetration. Then I moved the control points of the bottom end of each surface by 0.2" increments from top to bottom (but skipping the top surface), in order to create a "lip" that I felt could reflect the light toward the house. I finished my procedural manipulation by repeating the "lip" process but in the opposite direction to the other edge. This was thinking that the light would then reflect into the house. As I looked at my final model, I didn't know if this is how light would actually behave, maybe it would be more realistic for the flow of water, but none-the-less the idea to study how to actually maximize light in a building would be an interesting one.


Very interesting process. I especially like how you designed your process with specific architectural/ realistic properties in mind...something that I have trouble with. Plus your roof-like structure looks entirely different from your original surface, so you've further divorced the surface from your bear.
ReplyDeleteI wonder how your matrix analysis would look if you moved the separate lines of inquiry closer to each other so that it could start to really create a surface and not be distictive of one another. I say that because I look at the perspective shot you showed of the matrix and its intriguing and seeing the distance between them shrink to really give the feeling a pattern in your procedure would take it to the next level I think. The entire line could be a surface or even the entire matrix could be.
ReplyDeleteThanks for your input. I liked your idea so I tried to incorporate it in the next step for my matrices. Take a look at the newest blog with the results.
DeleteAnd yes that image of the diagonal house is very funny. Reminds me of the cartoon I used to watch as a kid "DragonBall Z" it was an anime show. Creative but very "corny" and "cheesy"
ReplyDeleteThis is true but the idea that I was pointing out is that with just small adjustments to coloring and surface projections it totally changes the thought / perspective of the viewer. I am sure that people that know about it come from all around the region to take a look at this house, just out of interest.
DeleteI really like the application of this study to that of a sun screen. Would be really interesting to get to the point where data points from the sun 100% the reason for each fold in the surface. Like a point cloud based on the ranges of temperature on a wall. Would be really cool.
ReplyDelete